What are we doing here?
This is the second part of a two-part series covering 1) CI (continuous integration/build) and 2) CD (continuous deployment/release) for Visual Studio SQL Server Database and Integration Services project types using the Azure DevOps) platform.Some background
The Visual Studio business intelligence (SSIS, SSRS, SSAS) and database projects types have long been the red headed step child of the Visual Studio ecosystem. Huge strides have been made in recent years but there are still some impediments, one of which is creating CI/CD pipelines for these projects in Azure DevOps.Don't fret
This step-by-step guide will walk you through creating a release pipeline for a solution containing both a SQL Server Database project and an Integration Services project.Assumptions (you know what they say...)
The following steps assume that you have already have a working Azure DevOps build definition. If not, you can refer to part 1 of this series.Let's do it
- Navigate to /Project/Pipelines/Releases and select New Release Pipeline.

- Choose “Start with an Empty job”.
- Name the Stage. An appropriate name might be the environment you’re deploying to such as “Development”.
- Click “Add an Artifact”.
- Select “Build” as the source type and choose the Project and Source (build pipeline) that will be deployed. If you haven’t already created a Build definition, see Continuous Integration (CI) with Visual Studio Team Services (VSTS), SSIS, and SQL Server Database Projects.

- Click the lightning bolt on the newly created Artifact, enable the Continuous deployment trigger and add a branch filter for master or whatever branch will be deployed.
- Click on the “1 job, 0 task” link in your newly created Stage.

- Click the plus sign to the right of “Agent job” to add a new task.

- Search for “Command Line” and add a new task.

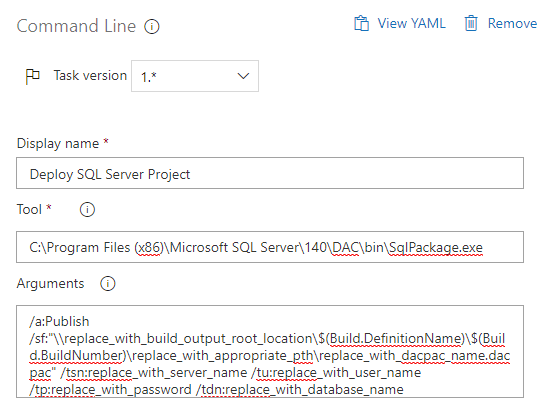
- Click on the new task and add populate the properties as follows.Keep in mind that this code is using SQL Server 2017. If you’re using another version, you’ll likely have to modify the Tool path.
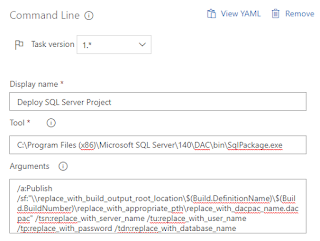
Argument text: /a:Publish /sf:"replace_with_build_output_root_location\$(Build.DefinitionName)\$(Build.BuildNumber)\replace_with_appropriate_path\replace_with_dacpac_name.dacpac" /tsn:replace_with_server_name /tu:replace_with_user_name /tp:replace_with_password /tdn:replace_with_database_name - Add another Command Line task and populate as follows.Argument text: /S /ModelType:Project /SourcePath:"replace_with_build_output_root_location\$(Build.DefinitionName)\$(Build.BuildNumber)\replace_with_appropriate_path\$(BuildConfiguration)\replace_with_ssis_ispac_name.ispac" /DestinationServer:"localhost" /DestinationPath:"/replace_with_appropriate_ssis_catalog_path"

- The previous tasks use a variable to tell us which build configuration to use. Add the variable by clicking on the “Variables” tab, then click +Add, enter “BuildConfiguration”, and set a default value that is the name of the build configuration that is appropriate for this Stage of the pipeline. This will depend on the names of the configurations that have been created in your Visual Studio solution.

- Always test! Create a release and make sure it deploys your projects correctly.


As always, if you have any questions feel free to drop me an email at david@elish.net.