Showing posts with label Continuous Deployment. Show all posts

Monday, June 3, 2019

Continuous Deployment (CD) with Azure DevOps, SSIS, and SQL Server Database Projects

What are we doing here?

This is the second part of a two-part series covering 1) CI (continuous integration/build) and 2) CD (continuous deployment/release) for Visual Studio SQL Server Database and Integration Services project types using the Azure DevOps) platform.

Some background

The Visual Studio business intelligence (SSIS, SSRS, SSAS) and database projects types have long been the red headed step child of the Visual Studio ecosystem. Huge strides have been made in recent years but there are still some impediments, one of which is creating CI/CD pipelines for these projects in Azure DevOps.

Don't fret

This step-by-step guide will walk you through creating a release pipeline for a solution containing both a SQL Server Database project and an Integration Services project.

Assumptions (you know what they say...)

The following steps assume that you have already have a working Azure DevOps build definition. If not, you can refer to part 1 of this series.


Let's do it

  1. Navigate to /Project/Pipelines/Releases and select New Release Pipeline.
  2. Choose “Start with an Empty job”.
  3. Name the Stage. An appropriate name might be the environment you’re deploying to such as “Development”.
  4. Click “Add an Artifact”.
  5. Select “Build” as the source type and choose the Project and Source (build pipeline) that will be deployed. If you haven’t already created a Build definition, see Continuous Integration (CI) with Visual Studio Team Services (VSTS), SSIS, and SQL Server Database Projects.
  6. Click the lightning bolt on the newly created Artifact, enable the Continuous deployment trigger and add a branch filter for master or whatever branch will be deployed.
  7. Click on the “1 job, 0 task” link in your newly created Stage.
  8. Click the plus sign to the right of “Agent job” to add a new task.
  9. Search for “Command Line” and add a new task.
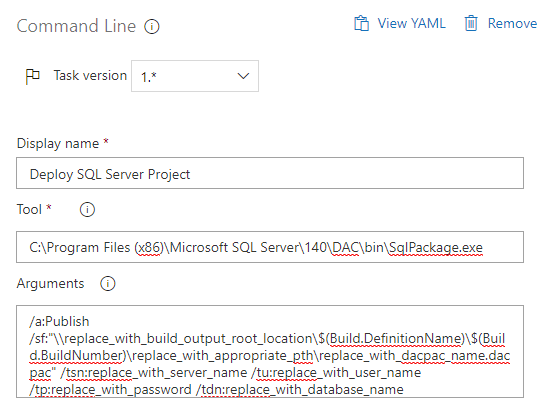
  10. Click on the new task and add populate the properties as follows.
    Keep in mind that this code is using SQL Server 2017. If you’re using another version, you’ll likely have to modify the Tool path.
    Argument text: /a:Publish /sf:"replace_with_build_output_root_location\$(Build.DefinitionName)\$(Build.BuildNumber)\replace_with_appropriate_path\replace_with_dacpac_name.dacpac" /tsn:replace_with_server_name /tu:replace_with_user_name /tp:replace_with_password /tdn:replace_with_database_name
  11. Add another Command Line task and populate as follows.
    Argument text: /S /ModelType:Project /SourcePath:"replace_with_build_output_root_location\$(Build.DefinitionName)\$(Build.BuildNumber)\replace_with_appropriate_path\$(BuildConfiguration)\replace_with_ssis_ispac_name.ispac" /DestinationServer:"localhost" /DestinationPath:"/replace_with_appropriate_ssis_catalog_path"
  12. The previous tasks use a variable to tell us which build configuration to use. Add the variable by clicking on the “Variables” tab, then click +Add, enter “BuildConfiguration”, and set a default value that is the name of the build configuration that is appropriate for this Stage of the pipeline. This will depend on the names of the configurations that have been created in your Visual Studio solution.
  13. Always test! Create a release and make sure it deploys your projects correctly.

As always, if you have any questions feel free to drop me an email at david@elish.net.


Tuesday, May 1, 2018

SSRS Continuous Deployment PowerShell Script using ReportingServicesTools

Way back in 2010 I wrote a post about how to use RS.exe to automate the publishing of SSRS objects such as reports, datasource, folders, etc. I got familiar with RS.exe at that time because I needed a way to include SSRS object deployment in a commercial software installer package. This time around I had a similar requirement except that the deployment is now for a CD (continuous deployment) pipeline for an open source project that I am working on called SSIS Project Weaver. It is an SSIS execution framework that includes a number of SSRS reports used to monitor and administer ETL batches.

Instead of using my old tricks I decided to see if there was anything else new out there. Turns out there is. Microsoft was kind enough to release a PowerShell-based project called ReportingServicesTools which targets SQL Server 2012+. Once installed, this PowerShell module provides 40+ commands for interacting with an SSRS instance. Not unlike RS.exe, its commands are not always straightforward.

I won't go into detail about what each command does as there's plenty of existing documentation on that. What I will do is post the PS script I'm using specifically for my CD scenario.

My requirements were the following:
  1. Wipe all objects from SSRS instance. Keep in mind that the objective of this script is to test the build and deployment of the source code of my project, not deploy to a production environment. Just in case I have other projects being deployed to the same server I created a switch so that I can choose whether or not to execute this portion of the script.
  2. Create a folder in which to deploy the reports. This is not a straightforward as one would hope. The ReportingServicesTools command does not provide an option to "force" or overwrite if the folder already exists. If the folder already exists the command fails.
  3. Deploy the datasource(s). Using PowerShell piping and object filtering we can deploy all of our datasources with a single reference to, but multiple executions of, the Write-RsCatalogItem command.
  4. Deploy all reports to a single folder. If you want to deploy to multiple folders you'll have to modify the script.
  5. Set all report's datasources. 
Before you can use the ReportingServicesTools commands and use the script below you must install the PS module by running the following command. 
Install-Module -Name ReportingServicesTool  

Write this script to a text file with a .ps1 extension.
1:  # Script Parameters  
2:  Param(  
3:    [string]$ReportServerUri = "http://localhost/ReportServer",  
4:    [string]$RdlFolder = "C:\vsts-rel\SSISProjectWeaver-CI\44\reports",  
5:    [string]$RsPath = "/",  
6:    [string]$RsFolderName = "SSISProjectWeaver",  
7:    [string]$DatasourceName = "SSISExecutionManager",  
8:    [switch]$CleanReportServer  
9:  )  
10:    
11:  #Delete all objects  
12:  if ($CleanReportServer) {  
13:    Get-RsCatalogItems -ReportServerUri http://localhost/ReportServer -RsFolder '/' | Remove-RsCatalogItem -ReportServerUri http://localhost/ReportServer -Verbose -Confirm:$false  
14:  }  
15:    
16:  #Create SSRS folder   
17:  $targetFolder = Get-RsFolderContent -RsFolder $RsPath | Where-Object { $_.Name -eq $RsFolderName }  
18:  if ($targetFolder -eq $null)  
19:  {  
20:    New-RsFolder -ReportServerUri $ReportServerUri -Path $RsPath -Name $RsFolderName -Verbose  
21:  }  
22:    
23:  #Create full path  
24:  $Destination = $RsPath + $RsFolderName  
25:    
26:  #Change local dir to location of .rdls  
27:  CD $RdlFolder  
28:    
29:  #Deploy datasource  
30:  Dir $RdlFolder -Filter *.rds | Write-RsCatalogItem -ReportServerUri $ReportServerUri -Destination $Destination -OverWrite -Verbose  
31:    
32:  #Deploy all reports to single folder  
33:  Write-RsFolderContent -ReportServerUri $ReportServerUri -Path $RdlFolder -Destination $Destination -Verbose -Overwrite  
34:    
35:  $DataSourcePath = $Destination + "/" + $DatasourceName  
36:    
37:  # Set report datasource  
38:  Get-RsCatalogItems -ReportServerUri $reportServerUri -RsFolder $Destination | Where-Object TypeName -eq 'Report' | ForEach-Object {  
39:    $dataSource = Get-RsItemReference -ReportServerUri $ReportServerUri -Path $_.Path  
40:    if ($dataSource -ne $null) {  
41:      Set-RsDataSourceReference -ReportServerUri $ReportServerUri -Path $_.Path -DataSourceName $dataSource.Name -DataSourcePath $DataSourcePath  
42:    }  
43:  }  

Here is a sample call of the script.
C:\deploy_ssrs_reports.ps1 -ReportServerUri "http://localhost/ReportServer" -RdlFolder "\\my-build-share\reports" -RsPath "/" -RsFolderName "SSISProjectWeaver" -DatasourceName "SSISExecutionManager" -CleanReportServer   

Monday, April 30, 2018

PowerShell PSSecurityException: UnauthorizedAccess

I just fought with this for close to an hour and the solution was REALLY simple so I thought I'd try and save someone else an hour of their life.

When trying to execute an unsigned PowerShell script (yeah let's not go there) from a VSTS release job I encountered the following error:


2018-04-30T20:35:34.8886378Z ##[error]. : AuthorizationManager check failed.
At line:1 char:3
+ . '\\exec-mgr-build\vsts-rel\SSISProjectWeaver-CI\38\deploy_ssis_proj ...
+ ~~~~~~~~~~~~~~~~~~~~~~~~~~~~~~~~~~~~~~~~~~~~~~~~~~~~~~~~~~~~~~~~~~~
+ CategoryInfo : SecurityError: (:) [], PSSecurityException
+ FullyQualifiedErrorId : UnauthorizedAccess

2018-04-30T20:35:34.9115615Z ##[error]Process completed with exit code 0 and had 1 error(s) written to the error stream.

I was able to workaround the error by using the local path (this wouldn't have worked if the PowerShell script was on another server). Even though I had a workaround I wanted to be able to use a UNC path. Turns out all you have to do is add the path as a Trusted Site. You can do this within Internet Explorer's security options like so:


Before I spend the rest of my day trying to explain why and how this works I am going to cut it short and get back to finishing my release definition. Hope this helps!