Monday, June 3, 2019

Continuous Deployment (CD) with Azure DevOps, SSIS, and SQL Server Database Projects

What are we doing here?

This is the second part of a two-part series covering 1) CI (continuous integration/build) and 2) CD (continuous deployment/release) for Visual Studio SQL Server Database and Integration Services project types using the Azure DevOps) platform.

Some background

The Visual Studio business intelligence (SSIS, SSRS, SSAS) and database projects types have long been the red headed step child of the Visual Studio ecosystem. Huge strides have been made in recent years but there are still some impediments, one of which is creating CI/CD pipelines for these projects in Azure DevOps.

Don't fret

This step-by-step guide will walk you through creating a release pipeline for a solution containing both a SQL Server Database project and an Integration Services project.

Assumptions (you know what they say...)

The following steps assume that you have already have a working Azure DevOps build definition. If not, you can refer to part 1 of this series.


Let's do it

  1. Navigate to /Project/Pipelines/Releases and select New Release Pipeline.
  2. Choose “Start with an Empty job”.
  3. Name the Stage. An appropriate name might be the environment you’re deploying to such as “Development”.
  4. Click “Add an Artifact”.
  5. Select “Build” as the source type and choose the Project and Source (build pipeline) that will be deployed. If you haven’t already created a Build definition, see Continuous Integration (CI) with Visual Studio Team Services (VSTS), SSIS, and SQL Server Database Projects.
  6. Click the lightning bolt on the newly created Artifact, enable the Continuous deployment trigger and add a branch filter for master or whatever branch will be deployed.
  7. Click on the “1 job, 0 task” link in your newly created Stage.
  8. Click the plus sign to the right of “Agent job” to add a new task.
  9. Search for “Command Line” and add a new task.
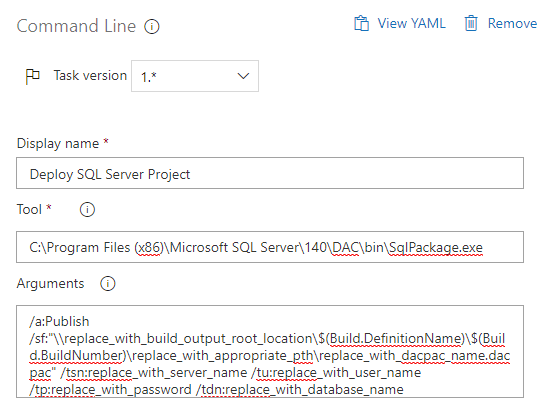
  10. Click on the new task and add populate the properties as follows.
    Keep in mind that this code is using SQL Server 2017. If you’re using another version, you’ll likely have to modify the Tool path.
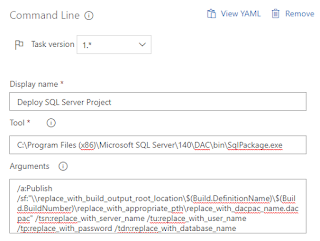
    Argument text: /a:Publish /sf:"replace_with_build_output_root_location\$(Build.DefinitionName)\$(Build.BuildNumber)\replace_with_appropriate_path\replace_with_dacpac_name.dacpac" /tsn:replace_with_server_name /tu:replace_with_user_name /tp:replace_with_password /tdn:replace_with_database_name
  11. Add another Command Line task and populate as follows.
    Argument text: /S /ModelType:Project /SourcePath:"replace_with_build_output_root_location\$(Build.DefinitionName)\$(Build.BuildNumber)\replace_with_appropriate_path\$(BuildConfiguration)\replace_with_ssis_ispac_name.ispac" /DestinationServer:"localhost" /DestinationPath:"/replace_with_appropriate_ssis_catalog_path"
  12. The previous tasks use a variable to tell us which build configuration to use. Add the variable by clicking on the “Variables” tab, then click +Add, enter “BuildConfiguration”, and set a default value that is the name of the build configuration that is appropriate for this Stage of the pipeline. This will depend on the names of the configurations that have been created in your Visual Studio solution.
  13. Always test! Create a release and make sure it deploys your projects correctly.

As always, if you have any questions feel free to drop me an email at david@elish.net.


Sunday, November 18, 2018

How to Share Power BI Reports On Your Website (for free)

Let's say your a geek and you're traveling the country in your 30 year old Airstream trailer and you have a bunch of data you'd like to share with other fellow digital nomads (oh wait, that's me). Data like how much money you've spent on gas and campground fees, the number of days you've been on the road and the states you've traveled to. Wouldn't it be cool to do that with Power BI...for free? Well you can and it's pretty easy. In this post I'll walk you through the steps necessary for "embedding" your Power BI reports in any web page/web site.

First things first

There are a couple of things we need to do to make this magic possible.

  1. Download Power BI Desktop. You're going to need something to author and publish your Power BI reports with. That's Power BI Desktop which can be downloaded here.
  2. Create a Power BI account. This account will allow you to publish your reports to the web, from where your web page will display them.
  3. Create a Power BI report that you'd like to share with the world.

Put yourself out there

Now that you have the proper tools and accounts and have created a deeply insightful report, it's time to publish your report to web. Publishing your report puts it on the Power BI servers and makes it available to share with your millions of adoring fans.
  1. If you haven't already, open your Power BI report in Power BI Desktop.
  2. Navigate to File -> Publish -> Publish to Power BI.


  3. Choose your workspace and publish.

Expose yourself

Now that you've published your report to Power BI it is available for you to "embed" in your web page. I have been putting "embed" in double quotes because Microsoft uses this term for another, more feature-rich (and not free) approach to sharing Power BI reports that we're not going to get into here. The approach we're going to use here simply uses an iframe to expose your Power BI hosted report in your own web page.
  1. Open your report on the Power BI website.
  2. Navigate to File -> Publish to Web.
  3. Copy the embed code
  4. Paste the embed code into your web page.

Bask in the glory

Start spinning up that HDFS cluster to handle all the web log data that will be coming in now that your website has fancy shmancy reporting for all the world to see ... for free (the reporting, not the hdfs). 


Wednesday, May 9, 2018

How to Execute an SSIS Package on Azure from On-premise or IaaS Server

So you have SSIS packages deployed to Azure using ADFv2 and an Azure-SSIS Integration Runtime but you still have on-premise or IaaS SQL Server(s) and want to initiate the execution of your Azure hosted packages from your on-premise or IaaS server(s)...

As I like to say, don't fret! This is pretty easy to do using straightforward, tried & true on-premise SQL Server technologies:

  1. Linked Server - A Linked Server is used to execute Azure SQL Database queries using four-part names (server.database.schema.object).
  2. Stored Procedures - The SSISDB create_execution and start_execution stored procedures are used to initiate package execution.
  3. SQL Agent Job - A SQL Agent Job is used to schedule the execution of the SSISDB create_executionstart_execution, etc. stored procedures.
There you have it. A rather painless way to execute Azure-based SSIS packages from your traditional SQL Server instance. This can be useful when migrating from on-premise and/or IaaS to PaaS.

Thursday, May 3, 2018

Integration Services Catalogs Node Not Visible in SSMS When Connecting to Azure Server w/ Azure SSIS Integration Runtime

So you went through all the steps to configure and deploy SSIS on Azure using an Azure SQL Server, Azure SQL Database (for SSISDB), Azure Data Factory v2 (ADF v2), and the Azure-SSIS Integration Runtime type but when you connect to the SQL Server using SSMS you don't see the familiar Integration Services Catalogs node. You see something like this:


Don't fret. You likely configured and deployed everything correctly and the service is eagerly awaiting your requests. All you have to do is explicitly specify the SSISDB when connecting. To do this, click the Options>> button in the connection dialog and enter SSISDB as the database name.


Click Connect and you should be good to go!


Tuesday, May 1, 2018

SSRS Continuous Deployment PowerShell Script using ReportingServicesTools

Way back in 2010 I wrote a post about how to use RS.exe to automate the publishing of SSRS objects such as reports, datasource, folders, etc. I got familiar with RS.exe at that time because I needed a way to include SSRS object deployment in a commercial software installer package. This time around I had a similar requirement except that the deployment is now for a CD (continuous deployment) pipeline for an open source project that I am working on called SSIS Project Weaver. It is an SSIS execution framework that includes a number of SSRS reports used to monitor and administer ETL batches.

Instead of using my old tricks I decided to see if there was anything else new out there. Turns out there is. Microsoft was kind enough to release a PowerShell-based project called ReportingServicesTools which targets SQL Server 2012+. Once installed, this PowerShell module provides 40+ commands for interacting with an SSRS instance. Not unlike RS.exe, its commands are not always straightforward.

I won't go into detail about what each command does as there's plenty of existing documentation on that. What I will do is post the PS script I'm using specifically for my CD scenario.

My requirements were the following:
  1. Wipe all objects from SSRS instance. Keep in mind that the objective of this script is to test the build and deployment of the source code of my project, not deploy to a production environment. Just in case I have other projects being deployed to the same server I created a switch so that I can choose whether or not to execute this portion of the script.
  2. Create a folder in which to deploy the reports. This is not a straightforward as one would hope. The ReportingServicesTools command does not provide an option to "force" or overwrite if the folder already exists. If the folder already exists the command fails.
  3. Deploy the datasource(s). Using PowerShell piping and object filtering we can deploy all of our datasources with a single reference to, but multiple executions of, the Write-RsCatalogItem command.
  4. Deploy all reports to a single folder. If you want to deploy to multiple folders you'll have to modify the script.
  5. Set all report's datasources. 
Before you can use the ReportingServicesTools commands and use the script below you must install the PS module by running the following command. 
Install-Module -Name ReportingServicesTool  

Write this script to a text file with a .ps1 extension.
1:  # Script Parameters  
2:  Param(  
3:    [string]$ReportServerUri = "http://localhost/ReportServer",  
4:    [string]$RdlFolder = "C:\vsts-rel\SSISProjectWeaver-CI\44\reports",  
5:    [string]$RsPath = "/",  
6:    [string]$RsFolderName = "SSISProjectWeaver",  
7:    [string]$DatasourceName = "SSISExecutionManager",  
8:    [switch]$CleanReportServer  
9:  )  
10:    
11:  #Delete all objects  
12:  if ($CleanReportServer) {  
13:    Get-RsCatalogItems -ReportServerUri http://localhost/ReportServer -RsFolder '/' | Remove-RsCatalogItem -ReportServerUri http://localhost/ReportServer -Verbose -Confirm:$false  
14:  }  
15:    
16:  #Create SSRS folder   
17:  $targetFolder = Get-RsFolderContent -RsFolder $RsPath | Where-Object { $_.Name -eq $RsFolderName }  
18:  if ($targetFolder -eq $null)  
19:  {  
20:    New-RsFolder -ReportServerUri $ReportServerUri -Path $RsPath -Name $RsFolderName -Verbose  
21:  }  
22:    
23:  #Create full path  
24:  $Destination = $RsPath + $RsFolderName  
25:    
26:  #Change local dir to location of .rdls  
27:  CD $RdlFolder  
28:    
29:  #Deploy datasource  
30:  Dir $RdlFolder -Filter *.rds | Write-RsCatalogItem -ReportServerUri $ReportServerUri -Destination $Destination -OverWrite -Verbose  
31:    
32:  #Deploy all reports to single folder  
33:  Write-RsFolderContent -ReportServerUri $ReportServerUri -Path $RdlFolder -Destination $Destination -Verbose -Overwrite  
34:    
35:  $DataSourcePath = $Destination + "/" + $DatasourceName  
36:    
37:  # Set report datasource  
38:  Get-RsCatalogItems -ReportServerUri $reportServerUri -RsFolder $Destination | Where-Object TypeName -eq 'Report' | ForEach-Object {  
39:    $dataSource = Get-RsItemReference -ReportServerUri $ReportServerUri -Path $_.Path  
40:    if ($dataSource -ne $null) {  
41:      Set-RsDataSourceReference -ReportServerUri $ReportServerUri -Path $_.Path -DataSourceName $dataSource.Name -DataSourcePath $DataSourcePath  
42:    }  
43:  }  

Here is a sample call of the script.
C:\deploy_ssrs_reports.ps1 -ReportServerUri "http://localhost/ReportServer" -RdlFolder "\\my-build-share\reports" -RsPath "/" -RsFolderName "SSISProjectWeaver" -DatasourceName "SSISExecutionManager" -CleanReportServer   

Monday, April 30, 2018

PowerShell PSSecurityException: UnauthorizedAccess

I just fought with this for close to an hour and the solution was REALLY simple so I thought I'd try and save someone else an hour of their life.

When trying to execute an unsigned PowerShell script (yeah let's not go there) from a VSTS release job I encountered the following error:


2018-04-30T20:35:34.8886378Z ##[error]. : AuthorizationManager check failed.
At line:1 char:3
+ . '\\exec-mgr-build\vsts-rel\SSISProjectWeaver-CI\38\deploy_ssis_proj ...
+ ~~~~~~~~~~~~~~~~~~~~~~~~~~~~~~~~~~~~~~~~~~~~~~~~~~~~~~~~~~~~~~~~~~~
+ CategoryInfo : SecurityError: (:) [], PSSecurityException
+ FullyQualifiedErrorId : UnauthorizedAccess

2018-04-30T20:35:34.9115615Z ##[error]Process completed with exit code 0 and had 1 error(s) written to the error stream.

I was able to workaround the error by using the local path (this wouldn't have worked if the PowerShell script was on another server). Even though I had a workaround I wanted to be able to use a UNC path. Turns out all you have to do is add the path as a Trusted Site. You can do this within Internet Explorer's security options like so:


Before I spend the rest of my day trying to explain why and how this works I am going to cut it short and get back to finishing my release definition. Hope this helps!

Thursday, April 26, 2018

Continuous Integration (CI) with Azure DevOps, SSIS, and SQL Server Database Projects

What are we doing here?

This is the first part of a two-part series covering 1) CI (continuous integration/build) and 2) CD (continuous deployment/release) for Visual Studio SQL Server Database and Integration Services project types on the VSTS (Visual Studio Team Services) platform.

Some background

The Visual Studio business intelligence (SSIS, SSRS, SSAS) and database projects types have long been the red headed step child of the Visual Studio ecosystem. Huge strides have been made in recent years but there are still some impediments, one of which is creating CI/CD pipelines in Visual Studio Team Services.

Don't fret

While it's not as straightforward as say a ASP.NET web application, with just a little finessing it's not overly difficult to build and deploy SQL Server Database and Integration Services project types. If you're familiar with creating VSTS build and release definitions it probably wouldn't take you too long to get it figured out. If you are new to this functionality it can definitely be a bit overwhelming. Hence, this step-by-step guide to standing up a basic VSTS build definition that includes both database and SSIS projects.

Assumptions (you know what they say...)

The following steps assume that 1) you have a VSTS account 2) a VSTS collection, 2) a VSTS project within the collection and 3) have a source control repository in VSTS Git, TFVC, GitHub, Subversion, Bitbucket Cloud, or Git (not necessarily hosted by VSTS).


This walk through will use an open source project called SSISProjectWeaver that is hosted on GitHub (using a different repository type requires little, if any changes). It's not necessary to know the details of the SSISProjectWeaver project other than that it contains a SQL Server Database project and two Integration Services projects.

<plug>If you're starting a new SSIS project it's worth checking out SSISProjectWeaver as it's a 100% non-invasive ETL framework that provides metadata-driven parallelism and dependencies between any two packages or groups of packages, extensive logging, reporting and dashboarding, alerting, and a bunch more. It's easy to set up and has been proven in large organizations with hundreds of packages running a day. You don't have to modify your existing code and if you don't like it you just stop using it. Nothing will have to change with your existing packages.</plug>

Let's do it

  1. Open you VSTS project and click on the Build and Release tab.
  2. Choose your source. For this example we are going to use GitHub.
  3. Once you've connected to the repository, select the branch that you want to build and click Continue.
  4. In the top right-hand corner under Select a template, click Empty Process. This will start us off with a blank build definition.
  5. Name your build definition appropriately and then choose the Agent queue. In this example we are using a Hosted VS2017 queue. Depending on your project you might want to use a local/on-premise build agent of VS2015. It all depends on your project types, versions, dependencies, etc.
  6. Before we define our build tasks let's create some variables. Click on the Variables tab and create the BuildConfiguration and BuildPlatform variables along with their corresponding default values.
  7. Navigate back to the Tasks tab and click the next to Phase 1. Search for and choose the Visual Studio Build task. This task will use the out-of-the-box msbuild template for building SQL Server database projects with a .dacpac as the build output.
  8. Change the Display name to something meaningful.
  9. Choose the SQL Server database project or solution to build.
  10. Choose the version to build.
  11. Use the newly created variables for the Platform and Configuration properties.
  12. Save the task.
  13. Navigate back to the Tasks tab and click the + next to Phase 1. Search for and choose the Command Line task. We will use this task as a workaround to a lack of an msbuild template for SSIS projects by calling invoking devenv to build the projects.
  14. Change the version to 2.*(preview). This version allows multi-line commands similar to a .bat file.
  15. Change the Display name to something meaningful.
  16. Enter the following text into the Script box. The first 8 lines just echo (print line) info that is useful for debugging. The last line is the actual command that is being executed.
    echo BuildShare: $(BuildShare)
    echo Agent.BuildDirectory: $(Agent.BuildDirectory)
    echo Build.SourcesDirectory: $(Build.SourcesDirectory)
    echo Build.ArtifactStagingDirectory: $(Build.ArtifactStagingDirectory)
    echo System.DefaultWorkingDirectory: $(System.DefaultWorkingDirectory)
    echo BuildConfiguration: $(BuildConfiguration)
    echo BuildPlatform: $(BuildPlatform)
    echo Command: "C:\Program Files (x86)\Microsoft Visual Studio\2017\Enterprise\Common7\IDE\Devenv.com" "$(Build.SourcesDirectory)\your_project_or_solution_name.(sln|proj)" /build $(BuildConfiguration)

    "C:\Program Files (x86)\Microsoft Visual Studio\2017\Enterprise\Common7\IDE\Devenv.com" "$(Build.SourcesDirectory)\your_project_or_solution_name.(sln|proj)" /build $(BuildConfiguration
  17. Save the task.
  18. Click on the Triggers tab and enable continuous integration. This will enable VSTS to execute this build definition each time code is committed to your source control repository.
  19. Test the build definition by clicking on Queue.
  20. Assuming your build was successful, you now have the CI half of your CI/CD pipeline and can auto-notify the world when one of your co-workers breaks the build!

Wrap Up

When it comes to technology, nothing is ever as simple as it appears. The SSISProjectWeaver solution is pretty straightforward in terms of code and dependencies. It's T-SQL and SSIS packages with no external dependencies. Building it is is very straightforward as you can see above. However, many projects are much more complex and require more complex configurations to set up a build definition. For example, the first time I created a build definition with an SSIS project it failed because I had references to 3rd party components. Of course Microsoft doesn't know I am using those components so it's not on their hosted build servers. To make it work I had to give up the convenience of using a hosted build server and stood up my own build server with all the necessary components. Food for thought. Don't be discouraged if you hit a few stumbling blocks on your way to automated build bliss!

Stay tuned for part two which will cover CD (continuous deployment) and will walk you through getting your code deployment automated.

As always, if you have any questions feel free to drop me an email at david@elish.net.

Sunday, March 11, 2018

Estimated Number of Rows = 1 Query Very Slow or Not Returning Data


A query that is slow that should be fast (e.g. underlying tables are not enormous, has been fast in the past, etc. - I'll let you determine what should or should not be fast) is often (but not always) slow because of a "bad" query plan. Determining what is and what is not a good query plan is not something we're going to get into here but if you're at your wits end with a query that has run for hours and should be much faster, there's a good chance you don't have an optimal plan.

If you've landed on this page it's likely that you've already looked at your query plan and seen that some operators are showing Estimated Number of Rows = 1 when you know there are definitely more rows than that.

A key ingredient to a good query plan is accurate cardinality estimation. Cardinality refers to the uniqueness of values contained within a particular column or index and has a strong influence on the SQL Server Query Optimizer. It will drive decisions such as which join operator (e.g. hash match, netsted loops, merge) to use which will significantly impact query performance.

If you're encountering the Estimated Number of Rows = 1 there's a good chance that either your statistics need to be updated and/or the Cardinality Estimator is failing you.

To resolve the issue first trying updating statistics on the table(s) in question. Use the WITH FULLSCAN option to cover your bases.

 UPDATE STATISTICS table_or_indexed_view_name WITH FULLSCAN 
 ALTER DATABASE SCOPED CONFIGURATION CLEAR PROCEDURE_CACHE; 

After you've updated your statistics, take another look at your query plan. Has the Estimated Number of Rows value changed to something more accurate? If so, try running your query again. If not, it might be that you're having issues with the Cardinality Estimator.

The Cardinality Estimator received an overhaul with SQL Server 2014 and while it's better in most cases, it is not in all. In fact, I stumbled upon a bug in the CE just last year that Microsoft acknowleged and fixed. If you suspect the CE is not working as it should be there are still a few things you can try.

First, determine if you're having an issue that someone else has already encountered and that Microsoft has fixed. You can do this by enabling trace flag 4199 which will enable all query optimizer fixes. You can first try this at the query level by using the following option.

 OPTION(QUERYTRACEON 4199)  

If this works and you want to apply this globally, you can execute the following.

 DBCC TRACEON (4199, -1); 
 ALTER DATABASE SCOPED CONFIGURATION CLEAR PROCEDURE_CACHE;   

If you still haven't solved the problem you can have SQL Server use the old or "legacy" CE as they call it. This can be used at the query level using the following hint after your query

 OPTION (USE HINT ( 'FORCE_LEGACY_CARDINALITY_ESTIMATION' ))  

or at the database level using the following script.

 ALTER DATABASE SCOPED CONFIGURATION SET LEGACY_CARDINALITY_ESTIMATION = ON; 
 ALTER DATABASE SCOPED CONFIGURATION CLEAR PROCEDURE_CACHE; 

And if none of that works...
Take a look at your query plan. Do you have Merge Joins that require sorts on large data sets? Are there Nested Loops that are taking forever (try using Live Query Statistics to find your bottlenecks). You can try using join hints to force a HASH join and see if that helps.

I know all too well how painful this type of situation can be. While we were very grateful that Microsoft fixed our problem, it took months to identify it and then months more before it was available in a service pack. Unfortunately for us, using the Legacy CE was not an option. Hopefully for you, one of these fixes will work!

Thursday, March 8, 2018

Visual Studio SQL Server Project (SSDT) OPENQUERY Warning

Using OPENQUERY in a stored procedure in a Visual Studio SQL Server project will result in the following warning.

 SQL70558: The column definition from this OPENQUERY function cannot be verified, and the operations involved with it might not be understood correctly.       

Depending on how your project and build is configured, this warning it may or may not fail the build. Regardless, if you have to use OPENQUERY and don't want the warning, you can use the Suppress TSql Warnings property on the stored procedure. To view this property in Visual Studio, click on the .sql file in the Solution Explorer window. You should now see this property in the last row of the Properties window. Enter the 70558 warning number. The warning should now be suppressed and will no longer appear in the Error window or the build output.

The Suppress TSql Warnings property can be used to suppress other warnings as well. To suppress multiple warnings just delimit them with a comma.

Tuesday, July 12, 2016

Script to Copy Data Between Two SQL Server Databases

I recently had a requirement to "copy" the data between two identical database schemas. Actually the requirement was to "rebuild" a database from the ground up (objects and data). I almost always Visual Studio SQL Server projects (available after installing SSDT as well as with the latest versions of Visual Studio) when doing database development which means I can deploy an "empty" database with more or less the click of a mouse so I won't get into creating the actual database, only populating it. If you need to copy the database objects to a new database there are tools built within SQL Server Management Studio to allow you to do this. You can check out this TechNet post for more information. You can also generate DML or data population scripts from SSMS but it can result in massive files if you have a database with a decent amount of rows. My databases were rather large so I wanted to copy the data from one database to the other without having to explicitly write anything to disk.

This stored procedure handles tables with Identity columns as well as Computed columns. It also only attempts to populate tables that have zero rows. You might have different requirements so feel free to enhance it and post any enhancements that you think would be valuable to others.

CREATE PROCEDURE [dbo].[apUtilCopyDataFromDatabase] @SourceLinkedServerName     VARCHAR(128) = NULL,
                                       @SourceDatabaseName         VARCHAR(128),
                                       @SourceSchemaName           VARCHAR(128),
                                       @SourceTableNamePrefix      VARCHAR(128) = '',
                                       @TargetLinkedServerName     VARCHAR(128) = NULL,
                                       @TargetDatabaseName         VARCHAR(128) = NULL,
                                       @TargetSchemaName           VARCHAR(128) = 'dbo',
                                       @OnlyPopulateEmptyTablesInd BIT = 0
AS
  BEGIN
 SET NOCOUNT ON;
 DECLARE @SQLCursorData       NVARCHAR(MAX),
              @SQLTruncate         VARCHAR(MAX),
              @SQL                 VARCHAR(MAX),
              @TableName           SYSNAME,
              @SchemaName          VARCHAR(MAX),
              @HasIdentity         BIT,
              @CurrentDatabaseName VARCHAR(128) = DB_NAME(),
 @TargetDatabase VARCHAR(128) = @TargetDatabaseName; --ToDo: Cleanup confusing names  

      DECLARE @SQLNoCheck NVARCHAR(4000) = 'USE ' + @TargetDatabase + '; EXEC sp_MSforeachtable @command1 = ''ALTER TABLE ? NOCHECK CONSTRAINT ALL''; USE ' + @CurrentDatabaseName + ';';
 EXEC sp_executesql @SQLNoCheck;

      SET @SourceDatabaseName = IIF(@SourceLinkedServerName IS NOT NULL, QUOTENAME(@SourceLinkedServerName) + '.', '')
                                + QUOTENAME(@SourceDatabaseName) + '.'
                                + QUOTENAME(@SourceSchemaName);

      SET @TargetDatabaseName = IIF(@TargetLinkedServerName IS NOT NULL, QUOTENAME(@TargetLinkedServerName) + '.', '')
                                + IIF(@TargetDatabaseName IS NOT NULL, QUOTENAME(@TargetDatabaseName) + '.', '')
                                + QUOTENAME(@TargetSchemaName)

      SET @SQLCursorData = 'DECLARE TableCursor CURSOR GLOBAL FOR
        SELECT
          s.NAME
          ,t.NAME
        FROM ' + @TargetDatabase + '.sys.tables t
          JOIN ' + @TargetDatabase + '.sys.schemas s
            ON t.schema_id = s.schema_id
          JOIN ' + @TargetDatabase + '.sys.objects AS o
            ON t.object_id = o.object_id
          JOIN ' + @TargetDatabase + '.sys.partitions AS p
            ON o.object_id = p.object_id
        WHERE
          t.type = ''U''
          AND t.NAME LIKE ''' + @SourceTableNamePrefix + '%''
        GROUP  BY
          s.NAME
          ,t.NAME
      HAVING SUM(p.rows) = 0 
OR ' + CAST(@OnlyPopulateEmptyTablesInd AS VARCHAR(1)) + ' = 0;'

      EXEC sp_executesql @SQLCursorData;

      OPEN TableCursor;

      FETCH NEXT FROM TableCursor INTO @SchemaName, @TableName;

      DECLARE @ColumnList VARCHAR(MAX);

      WHILE @@FETCH_STATUS = 0
        BEGIN
            BEGIN TRY
PRINT CHAR(13) + CHAR(10)
                      + '-----------------------'
                      + QUOTENAME(@SchemaName) + '.'
                      + QUOTENAME(@TableName)
                      + '-----------------------'

--ToDo: Add logic to determine if there are FK constraints. TRUNCATE if not, DELETE if there are.
                IF (@OnlyPopulateEmptyTablesInd = 0)
BEGIN
SET @SQLTruncate = 'DELETE FROM '
  + QUOTENAME(@TargetDatabase) + '.'
  + QUOTENAME(@SchemaName) + '.'
  + QUOTENAME(@TableName) + ';';

EXEC(@SQLTruncate);

PRINT CAST(@@ROWCOUNT AS VARCHAR) + ' rows deleted.';
END

                DECLARE @SQLHasIdentity NVARCHAR(1000) = 
'USE ' + @TargetDatabase + '; 
SELECT @val = CAST(SUM(CAST(is_identity AS TINYINT)) AS BIT)
                        FROM ' + @TargetDatabase + '.sys.columns
                        WHERE object_id = OBJECT_ID(QUOTENAME(''' + @SchemaName + ''') + ''.'' + QUOTENAME(''' + @TableName + ''')); 
USE ' + @CurrentDatabaseName + ';';

                EXEC sp_executesql @SQLHasIdentity, N'@val bit OUTPUT', @val = @HasIdentity OUTPUT;

SET @ColumnList = NULL;

                DECLARE @SQLColumnList NVARCHAR(4000) = 
'USE ' + @TargetDatabase + '; 
DECLARE @ColList NVARCHAR(MAX);
SELECT @val = COALESCE(@val + '','', '''') + QUOTENAME(name)
FROM '
 + @TargetDatabase + '.sys.columns
WHERE
 object_id = OBJECT_ID(QUOTENAME(''' + @SchemaName + ''') + ''.'' + QUOTENAME(''' + @TableName + '''))
 AND is_computed = 0 
 AND NAME NOT IN ( ''CreatedDate'', ''CreatedUser'', ''LastUpdatedDate'', ''LastUpdatedUser'' ); 
 USE ' + @CurrentDatabaseName + ';';

                EXECUTE sp_executesql @SQLColumnList, N'@val VARCHAR(MAX) OUTPUT', @val = @ColumnList OUTPUT;                

                SET @SQL = IIF(@HasIdentity = 1, 'SET IDENTITY_INSERT ' + QUOTENAME(@SchemaName) + '.' + QUOTENAME(@TableName) + ' ON;', '')
                           + 'INSERT INTO ' + @TargetDatabaseName + '.'
                           + @TableName + ' (' + @ColumnList + ') SELECT '
                           + @ColumnList + ' FROM '
                           + CONVERT(VARCHAR, @SourceDatabaseName) + '.'
                           + QUOTENAME(@TableName) + ' '
                           + IIF(@HasIdentity = 1, 'SET IDENTITY_INSERT ' + QUOTENAME(@SchemaName) + '.' + QUOTENAME(@TableName) + ' OFF ', '')
                           + ';';

                EXEC(@SQL);

PRINT CAST(@@ROWCOUNT AS VARCHAR) + ' rows inserted.';
            END TRY
            BEGIN CATCH
                PRINT ERROR_MESSAGE();
            END CATCH

            FETCH NEXT FROM TableCursor INTO @SchemaName, @TableName;;
        END

      CLOSE TableCursor;

      DEALLOCATE TableCursor;

 DECLARE @SQLCheck NVARCHAR(4000) = 'USE ' + @TargetDatabase + '; EXEC sp_MSforeachtable @command1 = ''ALTER TABLE ? CHECK CONSTRAINT ALL''; USE ' + @CurrentDatabaseName + ';';
 EXEC sp_executesql @SQLCheck;

      RETURN 0
  END


Tuesday, June 21, 2016

Visual Studio, TFS, Git, & GitHub

For those unfamiliar with TFVC it is one of the two version control engines shipped with Team Foundation Server, available with Visual Studio Team Services, and available on Microsoft's GitHub "rival", CodePlex. Many developers assume TFVC when they refer to using TFS but this assumption went out the window with TFS 2013 when it began shipping with the option to use either TFVC or Git as a version control repository.

There are many sites such as git-scm.com that do a great job a describing Git and what makes it so powerful so I won't get into specifics here but I will say that it excels over most other version control platforms when it comes to large, distributed projects. One such project is the Linux operating system. In fact, it was Linux's creator, Linus Torvalds, that developed Git to support the large, distributed nature of the development of Linux. Even with smaller projects, developers are embracing Git partially due to applications like GitHub that easily allow sharing and collaboration across the globe.

Git does such a great job that Microsoft itself is moving away from TFVC in favor of Git for many of its own projects. It's even hosting many of its public (open source) projects on GitHub including the .NET Core project.

...which brings us to GitHub. GitHub is not Git and Git is not GitHub. Git is a standalone version control application whereas GitHub is a web-based Git repository hosting service. GitHub allows users to create and share Git repositories and interact with them via the GitHub.com website, APIs, command line tools, IDE plugins, etc.

Back to Microsoft and its integrations with Git and GitHub...

1) CodePlex offers a Git version control option (it is the default):

2) TFS and Visual Studio Team Services offer a Git option (also the default option):

3) Visual Studio 2015 provides local Git repository integration as well as
GitHub integration:


If you landed here it's because you spend at least part of your time developing on the Microsoft stack and are interested in Git. If you know and like Git and didn't know if or how it integrated with Microsoft development tools, now you know enough to find the resources you need to get started. If you've only just heard about Git in passing and work with Microsoft development tools, I would urge you to do some research on Git and GitHub prior to starting your next project so that you can make an informed decision as to which version control system to use and if you want to use hosted repository service like GitHub.

Useful Links
  1. Interesting Wired article that gives some history of Git and GitHub
  2. The Register article about Microsoft moving projects to Git
  3. Visual Studio GitHub extension for all version of Visual Studio prior to Visual Studio 2015 Update 1.
  4. posh-git PowerShell Interface Install Overview which is also part of the GitHub Desktop app install
  5. Combining TFVC and Git repos in the same TFS project blog post


Wednesday, June 1, 2016

SQL Server 2016 Release Date

And...it's here! Looks like it was made available 12pm Eastern on June 1st, 2016.


Tuesday, May 31, 2016

Multiple Rows of Tabs/Docs in SSMS

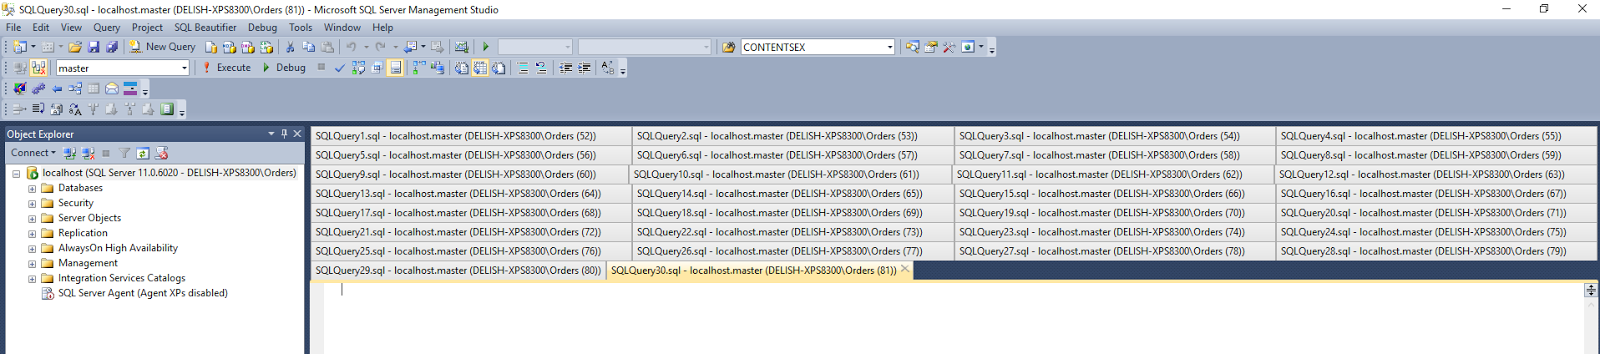
For a long time I felt like a crazy person for constantly closing documents in SSMS just because I could not easily access the documents that no longer had a visible tab. I would find myself resizing Object Explorer, maximizing SSMS, etc. to be able to see all the tabs. I'm sure I'm not the only one. In fact, Sergey Vlasov has created a Visual Studio plugin to deal with exactly this. Since SSMS is built on top of Visual Studio, the plugin works for those that also work exclusively in SSMS.

Visual Studio Gallery Link


Thank you Sergey!

Wednesday, March 5, 2014

SSIS Lookup Transformation Using Salesforce.com as a Data Source

Pragmatic Works offers a Salesforce.com Source component as part of its Task Factory SSIS component library. Using this component along with the out-of-the-box SSIS Cache Transform, it is possible to populate a Lookup Transformation with Salesforce.com data.

*Note: this post assumes you have, at a minimum, installed the trial version of the Pragmatic Works TaskFactory product.

Example scenario where this is useful: We have a data warehouse that contains customer account data. Each customer account can have a broker that is responsible for servicing the account (each account can have 0 to 1 broker and each broker can have 0 to many accounts). We want to write this data warehouse account data to a Salesforce.com Account object. The Salesforce.com Account object also has a relationship to a Broker object. In order for us to maintain this relationship in Salesforce.com, it is necessary for us to pass the Salesforce.com internal Broker Id when writing the data to Salesforce.com. Since we do not maintain the Salesforce.com Broker Id in our data warehouse me must look it up from Salesforce.com using a Broker Number that is a unique Broker identifier in our data warehouse. Since we cannot use the Salesforce.com Connection Manager in a Lookup Transformation we will use an approach that leverages the Cache Transform to allow us to have a Lookup Transformation that uses Salesforce.com data.

Let's take a look at the Control Flow of our package. 

As you can see, this simple package contains two Data Flows. The first (PopulateLookupCache) populates the Cache Transform  and the second (OleDBSourceToSalesforce) writes data to Salesforce.com . I've highlighted three of the components necessary to make this happen. The first is the PopulateLookupCache Data Flow and the second and third are Connection Managers of types CACHE and SALESFORCE.

Let's look at the PopulateLookupCache Data Flow.

This Data Flow uses the Pragmatic Works SalesForce.com Source component to retrieve data from Salesforce.com using a SOQL query and populates a Cache Transform (LookupCache) with the internal Salesforce.com Id and the external Id (BrokerNumber). Below is the Cache Connection Manager definition. Note the Index Position value of 1 for the BrokerNumber column. This means that BrokerNumber will be the column used to perform the lookup when we define our Lookup Transformation.

Now that we've populated our Cache Transform we can move on to our primary Data Flow that will perform our lookup using our cached Salesforce.com data.

In this data flow we retrieve Account data from a SQL Server database using our OleDBSource Connection Manager to write data to the Account object in Salesforce.com. In between our source and destination components we have 1) a Data Conversion transformation to convert our source system's BrokerNumber from non-unicode (VARCHAR/STR) to unicode (NVARCHAR/WSTR) and 2) our broker lookup that uses Salesforce.com data to retrieve the Account's Salesforce.com internal Broker Id using our source system's broker number.

Let's take a look at our lookup. As you can see, we're using the Cache connection manager connection type as opposed to the OLE DB connection manager connection type that we're so used to. This allows us to use the Salesforce.com data that we wrote to the Cache Transform in our previous data flow.

Next, we set the Connection to our LookupCache Connection Manager.

Once we've set our data source we can configure the lookup columns.

We join on our data warehouse BrokerNumber to retrieve the Salesforce Broker Id that we alias as Broker__c since this is the name of our Salesforce.com Account object's broker field.

As you can see from this post, using the Pragmatic Works Task Factory Salesforce.com Source component and the out-of-the-box Cache Transform component, it is possible to populate a Lookup Transformation with Salesforce.com data even though the Lookup Transformation does not directly support a Salesforce.com Connection Manager.